create entire articles mixed with images, forms, and other html elements.
The visual editor in WordPress can be seen when creating or editing text inside posts and pages. To see it in action, add a new post through your WordPress admin panel. What you will see is something like the picture below.
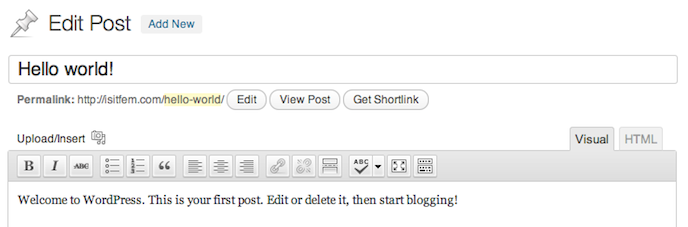
The visual editor is the gray bar that shows up above the post box itself, and the icons which run left to right in that gray bar control the text formatting options.
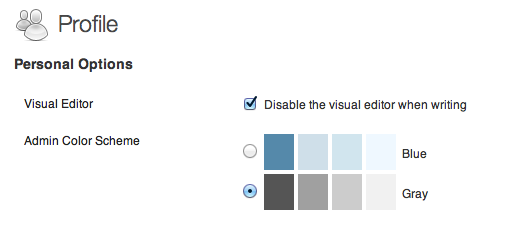
The very first option allows you to enable the visual editor. Make sure this check box is not selected, then click save. Return to your post editing and the visual editor should be enabled.
But before we jump into editing, we’re going to turn on even more options within the visual editor. We do that by clicking on the icon to “show the kitchen sink.”
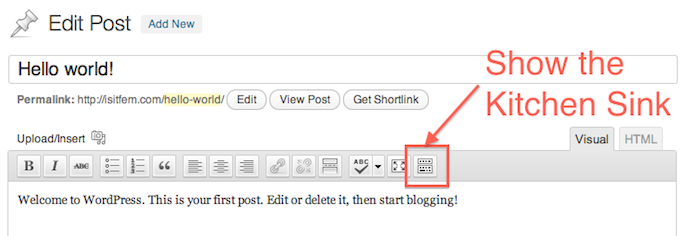
Once you do, more options will pop up below the first line of icons. These include the heading format options, the ability to change text color, pasting options, undo and redo, and even a help section. The new icons are highlighted in red below.

General Formatting
The general formatting elements, which mirror most popular word processors, are highlighted below in red. They include the following customizable elements:

Bold
It’s easy to make your text bold. Simply highlight the characters and words you’d like to put emphasis on and then click the big ”B” icon. WordPress also supports classic shortcut keys. For mac, bold is COMMAND + B, on a PC it’s CTRL+B.
Italics
To italicize text in WordPress you highlight the characters you want to change and click on the “I” button. Again, shortcut keys are available: command +I on macs and CTRL+I on PCs.
Strike Through
WordPress gives you the option to highlight your text by placing a line through it. This is called strike through, and it looks like this. While you’re editing text, strike through will show up red like this,
but in the live post it will show up as the normal unformatted color.
It can be turned on by highlighting the text and clicking on the third
icon from the left, “ABC” with the line through it.
Underline
Another classic formatting style is the underline. This format can be selected by clicking the “U” icon with the line under it. It is located in the bottom row of elements below the other formatting options mentioned in this section. Command +U on macs and CTRL + U on PCs will get you underline text.
Font Color
WordPress gives you the ability to change font color on the fly by selecting the “A” icon with a thick bar beneath it. You can choose from one of 40 popular colors, or click on the icon’s small down arrow which, when pressed, shows a drop down color picker menu giving you nearly unlimited color options.
Any of these elements can be used in conjunction with the other. For example, you could create bolded, green, italicized, underlined text.
Lists and Blockquotes
The visual editor makes it easy to give your text some punch, by allowing easy formatting of lists and block quotes.

Unordered Lists
An unordered list is one which contains bulleted elements with no hierarchical order – lines are simply listed in a single column, indented from normal paragraph text.
- This is a top line list item
- This is another list item
- Ooh, here’s a third list item
Hitting enter while in an unordered list creates a line break and another list element. When you want to escape out of the list element feature, hit the enter key twice and text returns to normal.
Ordered / Numbered Lists
An ordered list is one in which its elements have priority, hence the numbered headings. The ordered list works the same way as the unordered list; indented and lined up in a single column.
- This is a top line ordered list item
- This is the second list item in an ordered list
- It just keeps going, and going, and going…
Blockquotes
Blockquotes are a great way to display and format quotations and special aside text, as shown below.
Here, the text is indented, italicized, raised in font size, and slightly bolded. Different themes will display block quote in different ways, and it can be further controlled with custom CSS. Hitting the enter button twice doesn’t escape you from block quotes though. To do that, once you’ve completed your paragraph of block quote text, press the enter key to start a new line, and then hit the block quote icon, which look like open apostrophe symbols.
Blockquote is unique in that while you’re editing the text, the formatting doesn’t show up in the post editor box. A block quote, while you are editing, is indented, but the formatting only shows up on the live post.
Text Alignment
There are four alignment options in WordPress which mimics other word processors with left, right, and center aligned text, plus the full justify.

Left Align
Left align is the standard in most english language editors, and starts your text line at the left most margin. This paragraph is left aligned.
Center align
Center Align also does as its name suggests – centering your text between the left and right margins. This paragraph is center aligned.
Right Align
Right align is basically the opposite of left align. It places the text starting on the right margin and successive lines in the paragraph are also placed starting on the right margin. This paragraph is right aligned.
Full Justify
The full justify icon is the only alignment icon on the bottom row of the visual editor. The full justify adjusts character spacing to make your text touch both the left and right margins. This creates a consistent block look as text flows down the page and can be more aesthetically pleasing with particularly long paragraphs. The downside of the full justify comes when you use short sentences. In these cases, the extra spacing WordPress adds to stretch the text from margin to margin creates large spaces between words, which can sometimes make the text look uneven.
Inserting Links and the More Tag
WordPress makes it easy to insert links into your post with the next three icons in the visual editor. Linking inside your articles can help keep people reading articles on your website and can also improve your search engine rankings.

Add a Link
To add a link, highlight the text which should be linked and click the chain icon. This will open a link window dialogue box in which you can enter the URL address of the link and an alternate title, which shows up when the viewer mouses over the linked text in the actual live post. A WordPress text link looks something like this.
Remove a Link
You can remove URL links from your text. Simply highlight the linked text in the WordPress editor and click the broken chain link icon. This removes any link and html formatting which might be created when inserting links or pasting in text which might have links embedded in it.
The More Tag
The more tag is unique to WordPress. Blogs which are set to show full text can become awkward when the first post is extremely long. Long posts can extend down below the sidebar, pushing elements below it even further down the page. This is poor design, especially if your blog features teasers or secondary content. If that content is pushed far enough down the home page, viewers may not see those articles, and leave your site before experience all it has to offer.
This is where the more tag comes in. By clicking the dash line icon WordPress inserts the more tag where your cursor was placed when you clicked the icon. The more tag is similar to using a page or section break in common word processors. On the home page of your blog, the full post will only show the content that was placed above that more tag. Everything else below it will be hidden, and only accessible after the viewer clicks on a “read more” link which is automatically added to a post which uses the more tag.
Spell Checker
The WordPress spell checker works much like your normal word processor. WordPress doesn’t automatically check spelling as you type, so you’ll have to click on the ABC button with the check mark beneath it to check your post spelling. It will place a red line underneath incorrectly spelled words, or words that the post editor’s dictionary doesn’t recognize.

WordPress does a good job of recognizing most common parlance and slang, but some words do slip by. Simply click on a red underlined word and WordPress will give you choices you can select to correct the unrecognized word. If the word is, in fact, spelled correctly, you can also tell WordPress to learn the word – so it doesn’t flag that work next time; or you can tell WordPress to ignore the incorrectly spelled word – which skips it for this post, but will still highlight it on other posts.
Full Screen
Most browsers come equipped with a way to view the page in full screen mode, but WordPress includes a full screen post editor too. Clicking the icon with arrows pointing to the four corners will take your post editor box and make it take up your entire browser screen. Essentially, this hides all the other boxes you see while editing posts, including publishing sections, categories, and any other meta box you might have enabled.

Headings and Paragraph Formatting
You might not have realized it, but we’ve been using headings and paragraph formatting all through this post. They are the bolded headings introducing each new section of this article. Headings and paragraph formatting can be access by clicking the drop down box labeled “Paragraph.”

There is a hierarchy to these formatting elements starting with heading 1 and running through heading 6, in order of importance. They look like this:
Heading 1
Heading 2
Heading 3
Heading 4
Heading 5
Heading 6
Search engines like Google and Bing view these elements in your post and use them to determine importance of text on the page. Headings are extremely important for contextual search engine readings.
Other choices in paragraph formatting include Address and Preformatted.
Address
Address italicizes your text and pulls the lines in tight. It is commonly used to display physical addresses and separate them from other normally formatted text. It looks like this:
123 Main Street Anywhere, USAPreformatted Text
Preformat places your text in a basic system font within a box. This is commonly used to display code, and to separate the element further from normal text.
Preformatted text is shown in a text box with system font settings. To exit preformat text, finish your paragraph, hit enter to start a new line, and then click back on the paragraph down arrow and choose "paragraph" formatting to return to normal text.
Copy and Paste
While WordPress makes it easy to create posts entirely in the visual editor, sometimes you need to copy and paste text from other programs. Some third-party programs use nonstandard encoding and text pasted from those programs could transfer with additional characters that ruin formatting in WordPress.

The most popular third-party applications commonly used with WordPress are plain text editors and Microsoft Word, so WordPress has included two icons to handle pasting in text from those programs. Using these icons to paste text, rather than just clicking inside the post box and clicking CTL +V or Command +V, will strip any unnecessary characters from the clipboard and paste your text cleanly into the WordPress visual editor.
The third icon in this section is the un-format button, which will remove from highlighted text any format it might have associated with it. The unformat is aptly shaped like an eraser. This works much like the unlink icon, except the unformat icon will remove any formatting at all – including headings, paragraph styles, html, and colors, but….not links. Links will remain.
Special Characters
The Omega symbol, when clicked, opens a dialogue box giving you a choice from dozens of special characters, like symbols, arrows, mathematical symbols, and accented letters from alternate language alphabets.

Here are a few special characters WordPress allows your to enter into the post box: Δ € © ® ♠ ♥ √
Indent and Outdent
The indent button (arrow right) will push the highlighted text a few spaces into the line. It is used to show priority without using a list item.
This paragraph has been indented.
The outdent button (arrow right) is used to remove formatting from an indented paragraph.

Undo, Redo, and Help
The final three icons in the post editor allow you to correct mistakes and get help when you’re stuck.
Undo - Clicking the rounded arrow pointing left will undo your last keystroke or formatting change.
Redo – Clicking the rounded arrow pointing right will counter your last undo, by replacing the keystroke or formatting that was recently undone.
Help – Clicking the question mark icon will bring up a help dialogue box, which lists tips about using the post editor, hot keys for quick formatting, and information about your version of WordPress.

If you’re new to WordPress and are having trouble working your way through the visual editor, it might help to view this section first to get a basic understanding of how the post and page editing boxes work.
Finish it Off with HTML
When all else fails, you can always correct any formatting errors by editing the HTML. In the end, WordPress uses HTML to display text on the live page. If you switch to the HTML tab as you are creating and editing text you will see WordPress automatically add the correct HTML corresponding to the formatting options you choose in the visual editor.

If you choose, and if you understand HTML, you could create your entire post in the HTML editor, but it is not as graphical and will not show any real formatting, just code.
For example, in the HTML editor, a heading 1 is denoted like this:
<h1>This is a Heading 1 Format</h1>
But when the post goes live, Heading 1 looks like this.
Summary
The WordPress visual editor makes it easy to create and format your posts and make them look great on the page. It adds a graphical element to your post which cannot be accessed using the simple HTML editor. The best way to learn how to use the visual editor is to practice using each element in your posts. Test them with your theme and see what works.